Time for me to try my first device in the XROS range – the Vaporesso XROS 4 Nano pod kit!
 Honestly I think I am the only person who has never tried an XROS kit!
Also I have this dilemma of how to pronounce the name? I always say “Ex-Ross” whilst apparently some people say it like “Cross”? Let me know in the comments your preference!
The XROS family of devices is extremely popular with many people swearing by them for flavour and performance.
This is part of the XROS 4 family which also consists of the XROS 4 and XROS 4 Mini.

Thank you to Vaporesso for sending this over for review. As always my opinions are based on my experience with the device(s) in my possession. Sometimes we are sent “sample” models which may differ from full retail versions.
What To Expect From The Vaporesso XROS 4 Nano?
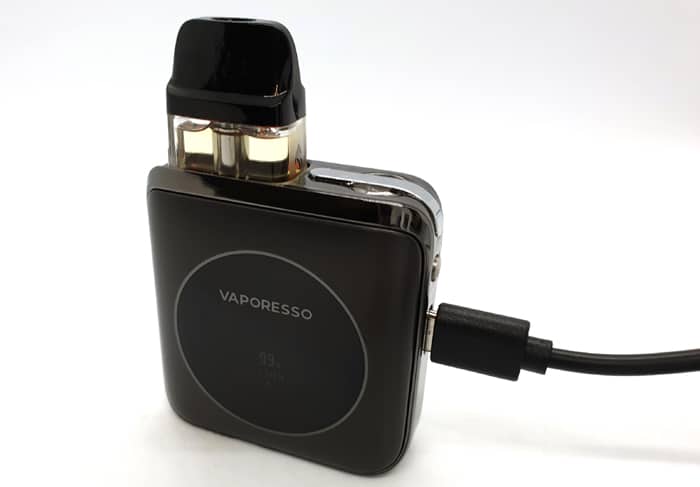
The Vaporesso XROS 4 Nano is a pod kit with 2 main components – the main device and the refillable and replaceable pod.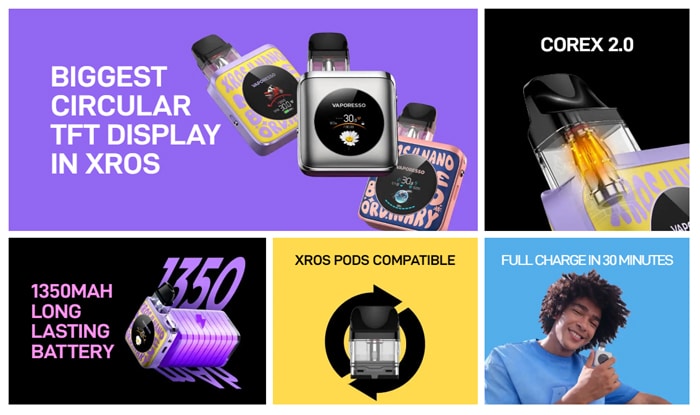
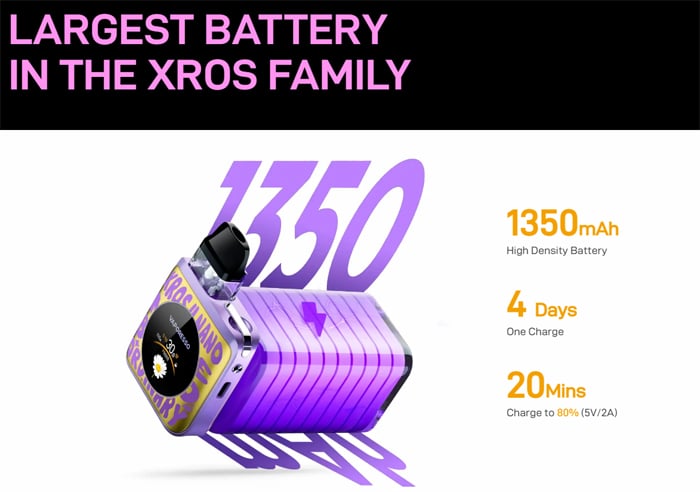
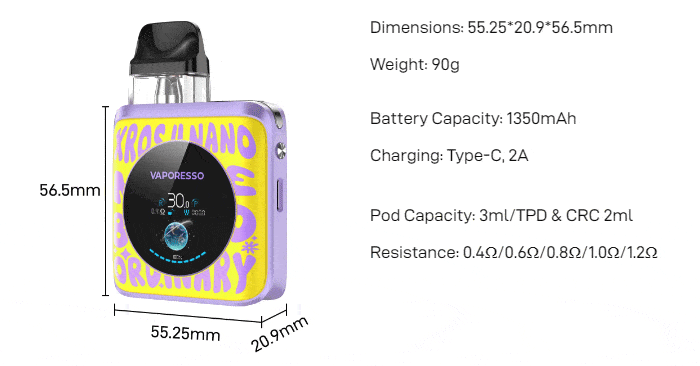
Looking first at the device, it packs a 1350mAh battery which is quite substantial for a device this size. A USB Type C port is provided for charging at a 2A rate in apparently 30 minutes! I will let you know if that boast is true later in the review!
The main stand out feature is the whopping 1.3 inch colour TFT screen – it is probably higher spec than the telly in my bedroom!
You can change the screen theme and there are also optional animations for when you are vaping.
When it comes to the output – this is quite unusual as it depends on the pod you are using.
For the 0.4ohm pod you get a full variable wattage style adjustment.
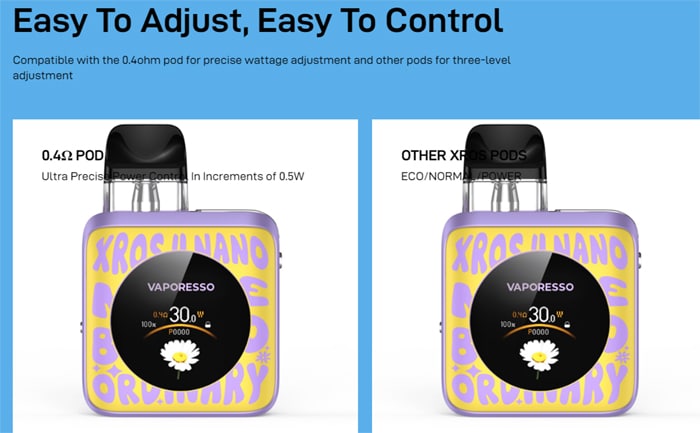
However for the rest of the pod options you can choose from just 3 modes:
- Eco (economical on battery usage)
- Power (a bit of a power boost)
- Normal (which is erm… normal?)
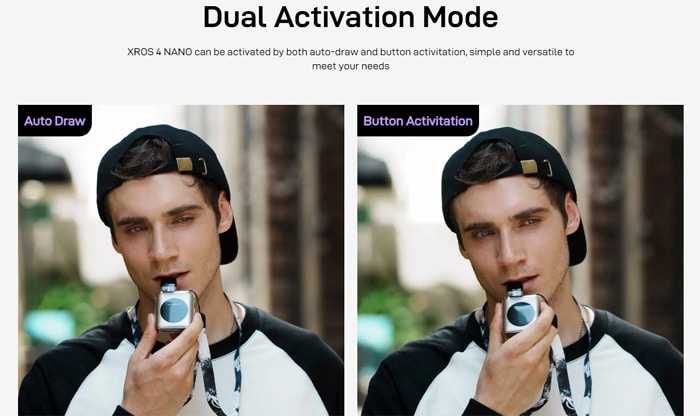
An operation button is provided to select all your operating options. You can choose between auto draw firing (inhale on the mouthpiece to trigger the automatic firing) or manual button firing – or of course both!
On the side of the mod is an airflow adjustment slider to tailor the incoming airflow to suit the pod installed.
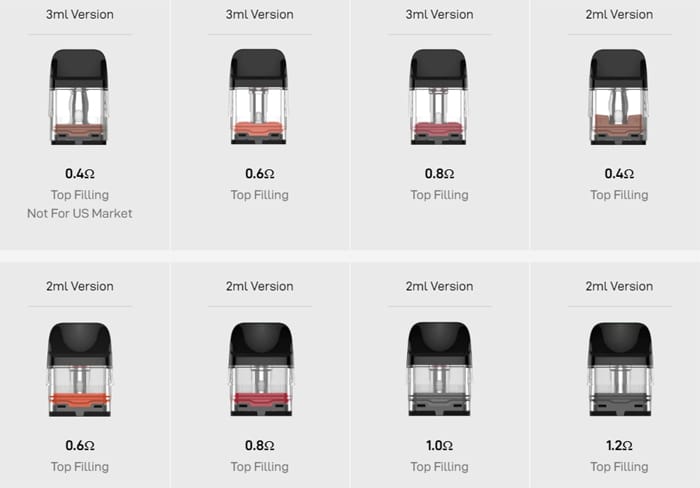
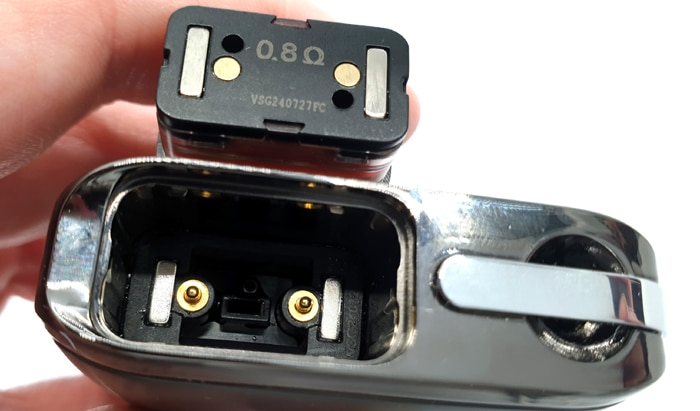
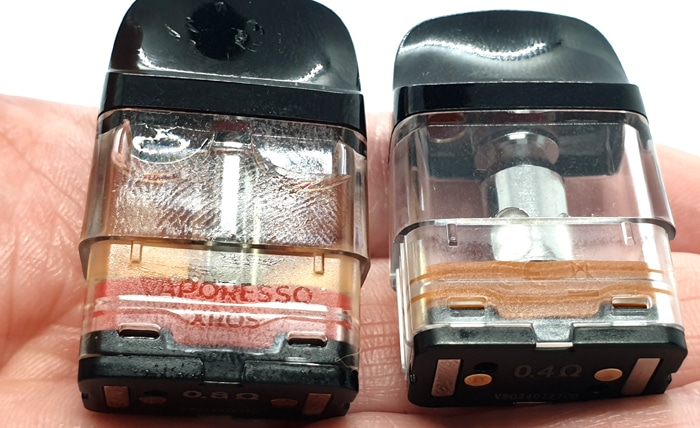
Now talking of pods – this is compatible with ALL – yes ALL – of the previous XROS pods. Perfect! The kit contents depend on the region but you will be getting 2 pods either the 0.6ohm and 0.8ohm or the 0.8ohm and the new 0.4ohm.
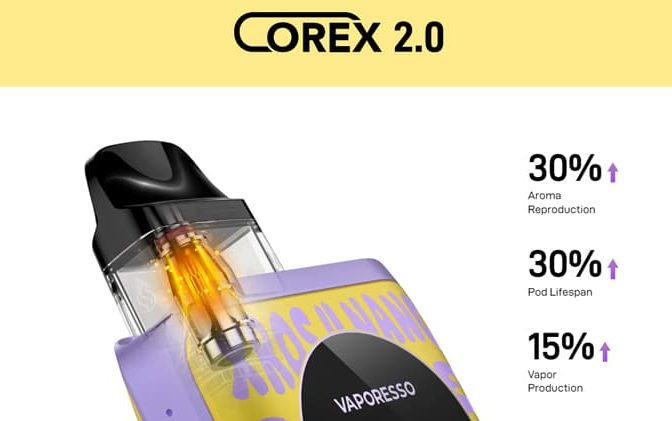
The 0.4ohm pod also encompasses the COREX 2.0 technology to prolong pod life and improve the performance.
These have a top fill port which you access by removing the mouthpiece and they will hold 3ml of your own e-liquid as standard. Sadly for us poor buggers in TPD regulated areas that is reduced to 2ml – boo.
Here is an introduction video from the Vaporesso_EU YouTube channel.
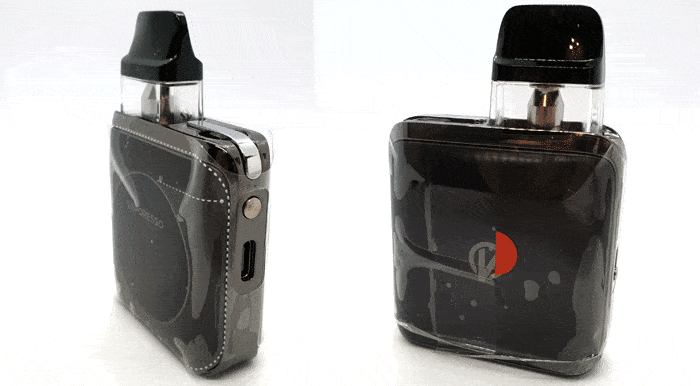
You can choose from 8 colours: Race Track, Word-Pop Yellow, Aquamarine, Word-Pop Blue, Camouflage, Twilight Purple, Graphic Black and Titanium Silver.

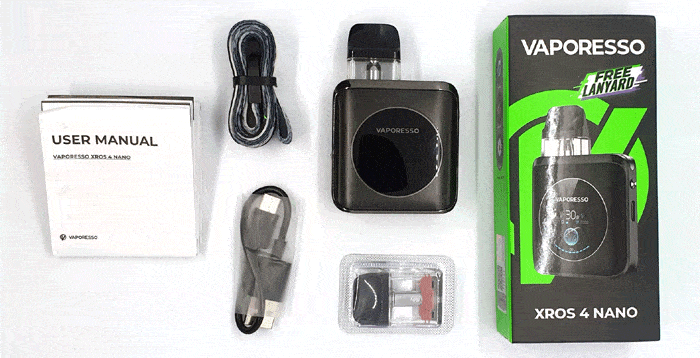
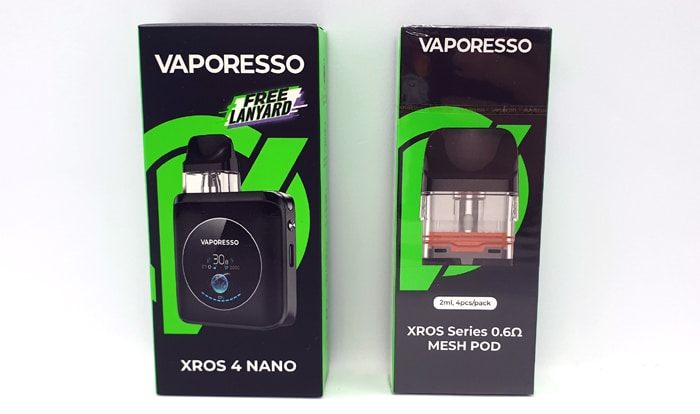
Kit Includes
There are 4 kit variants available depending on the area which the kit is to be sold. The TPD and US kit versions swap the 0.4ohm pod for the 0.6ohm pod.
- Vaporesso XROS 4 Nano device
- 0.4ohm XROS Pod
- 0.8ohm XROS Pod
- Lanyard
- USB Type C cable
- User manual
Vaporesso XROS 4 Nano Specs
- Size: 55.25×20.9×56.5mm
- Battery: 1350mAh (internal)
- Display: 1.3 inch Colour TFT screen
- User modes: Variable Wattage (with 0.4ohm pod) / Eco, Normal or Power for other XROS pods
- Output: Not specified
- Type C USB charging – 2A charge rate – 30 min charge time
- Resistance range: Not specified
- Capacity: 3ml (Standard) / 2ml (TPD / CRC)
- Top fill
- Compatibility: Compatible with XROS Pods
- Adjustable airflow
- Auto draw / button activated
Vaporesso XROS 4 Nano Design & Build Quality
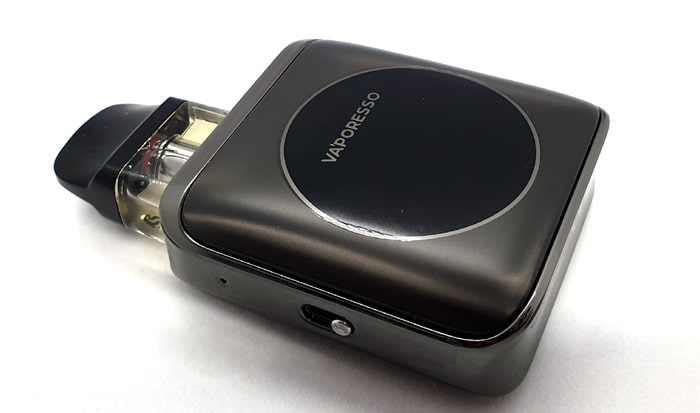
I received the Graphite Black version with the 3ml pods. Also Vaporesso kindly sent some of the 0.6ohm pods as well so I will test drive them!
The kit contents vary according to the market. This version is the “Global Kit” version so it included the 0.4ohm and 0.8ohm pods. However with other regions the 0.4ohm is swapped for the 0.6ohm pod. So I have all options now with the extra 0.6ohm pods!
The packaging is very “Vaporesso” – the plain Black packaging which is brightened up with the Neon Green logos.
Inside the box it is split into 2 sections. If you open the top you can access the device with the pod. Open the bottom of the box to access the accessories.
There is very little plastic apart from the wrapping on the mod and the pod container so the majority can be recycled.
Inside the box the device is fully wrapped in a protective plastic cover. There is even a pull tab marked to remove it!
Not only do you get a spare pod, but you also get a USB cable and a good quality lanyard included in the kit. Many kits omit these items to keep prices low.

The instruction manual feels like a newspaper, it is huge! But does cover multiple languages!
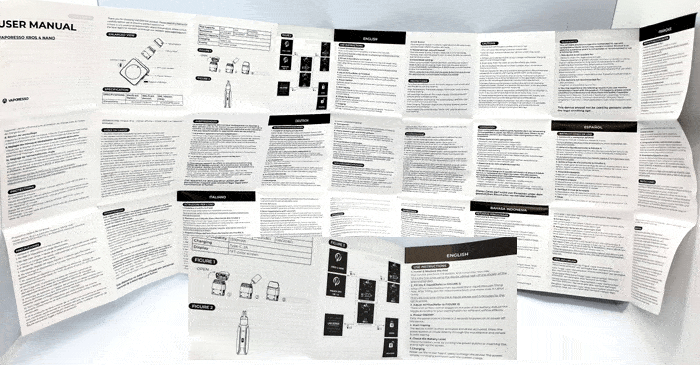
Sadly at present there is no online user manual available. I am a bit gutted as the text is really bloody small on the paper version! However keep checking here as I am sure the manual will be uploaded soon.
Vaporesso XROS 4 Nano Mod
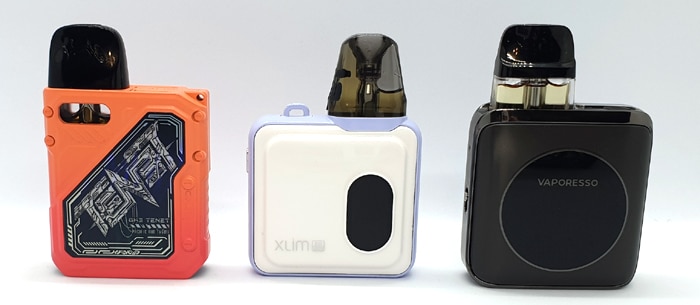
This really is a stunning looking device! The shape reminds me of the Lost Vape Ursa Baby Pro, the OXVA Xlim SQ Pro and the Uwell Caliburn GK3 Tenet.
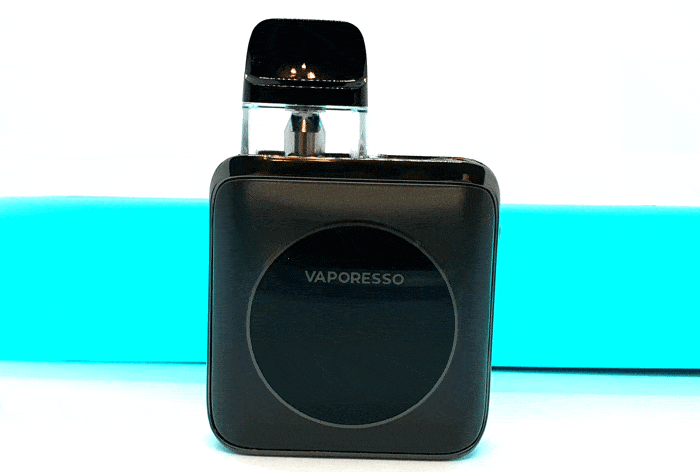
On my version the main frame is a dark shiny Gunmetal colour with Chrome and Black accents – it really does look fabulous! And I am not normally a fan of Black kits!
The front and rear of the device has a slightly matte Black finish panel which curves around to meet the main frame.
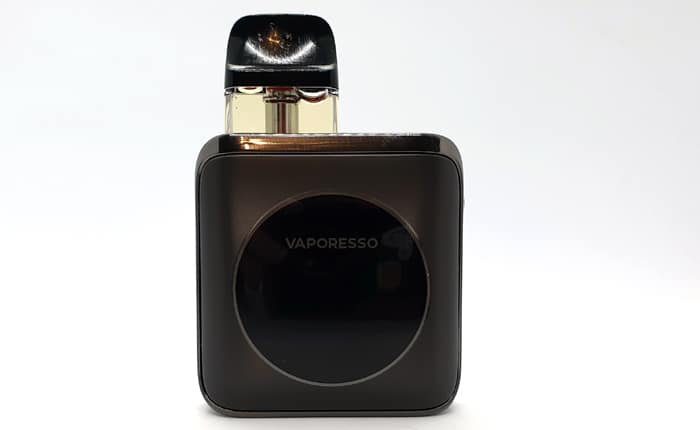
Obviously the screen panel takes up the majority of the front panel with a diameter of around 37mm. This is not all screen though, the screen is hidden until it lights up.
At the top of the circular screen panel is the Vaporesso name in a similar colour to the decorative ring around the panel.
On the rear is the Vaporesso logo printed on.
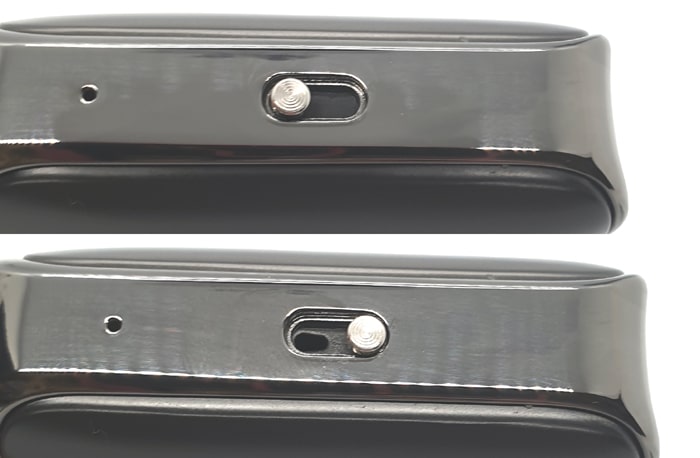
The left side of the device features a small airflow inlet hole and the airflow adjustment slider. This does not protrude far and has a good size knob (ooooh-er) but is slightly stiff. It is better to be that way than loose where it is adjusting itself.

On the opposite side you will find the tiny weeny operation button! It is about 4mm in diameter with a “Record Groove” style texture. It is perfectly clicky and responsive – no issues at all. But might be a bit small if you are using it regularly for button firing – it might take a while to accurately hit the button every time without looking!
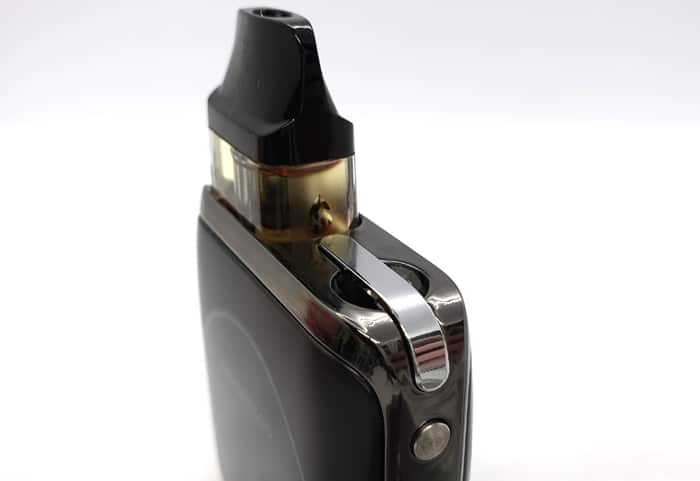
Above the operation button is the pretty Chrome accent lanyard hook. This is actually like a bar which sits over a dip in the mod body to allow the lanyard to be easily installed. Actually this was far easier that a lot of similar style mods.
Under the operation button is the USB Type C port which works perfectly well and is nicely recessed to help prevent damage or contamination.
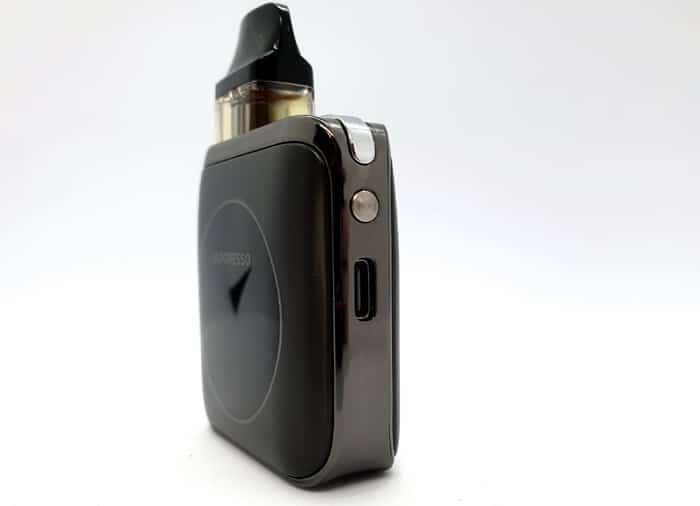
Looking at the base of the mod – this has a strange profile! It is machined in a kind of flattened “U” shape and feels super smooth and you do keep rubbing it!
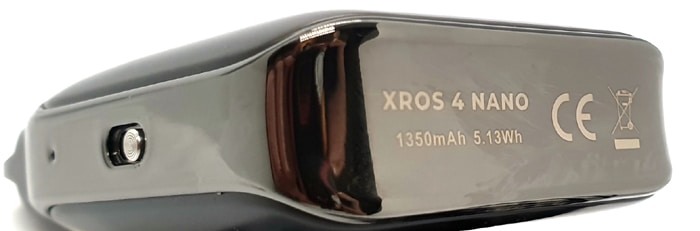
On here you will find the device name, battery specs and required legal logos etched on in a sort of Beige colour.
The top of the mod houses the pod compartment which has a nice magnetic strength to allow the pod to be removed easily but it is reluctant to fall out too!
The only downside I can find is that the device is a bit heavier than you would expect and with it having a smooth finish you can accidentally let it slip out of your hand quite easily. But that is easily fixed – use the lanyard!
Screen
This is the big impressive part of the Vaporesso XROS 4 Nano and I love it!
As mentioned above the screen is stealth! You will only see it when it lights up. The actual display area is around 30mm x 25mm but is super clear and bright.
The display you see will depend on the theme you have set and the pod installed…
The themes all have different animations which you can turn on and off that appear when you vape. I would love to be able to add more in future – are you listening Vaporesso???
I will demonstrate them for you in the video below!
0.4ohm Pod
The screen displays more information with this pod as you get to adjust the output.

You will see the pod resistance in ohms (Ω), output level selected in Watts (W) plus the puff counter and battery charge remaining.
Other Pods
For all other pods you can only choose from 3 user modes – Eco, Power and Normal so all the screens are quite basic.
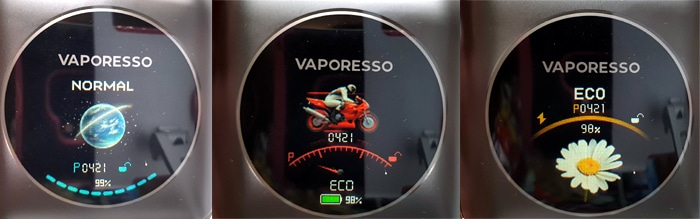
In all the themes you will see a kind of scale – like a speedo – which displays… well I am not sure what it displays to be honest? It has a padlock at one end and a letter “P” or a spark symbol at the other and never seems to move. There is a needle that points on the Motorcycle view which points to the low end of the scale for ECO, middle for Normal and top for Power.
You also get a battery charge percentage and on the Motorcycle theme you get a battery icon.
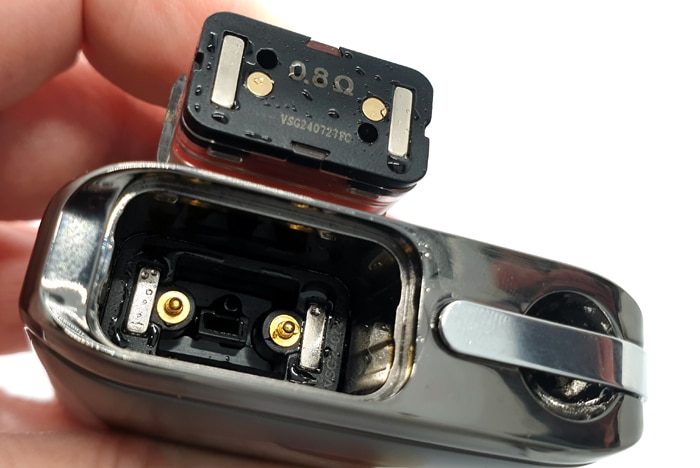
XROS Pod
These have been covered in previous reviews but I will just cover the basics here.
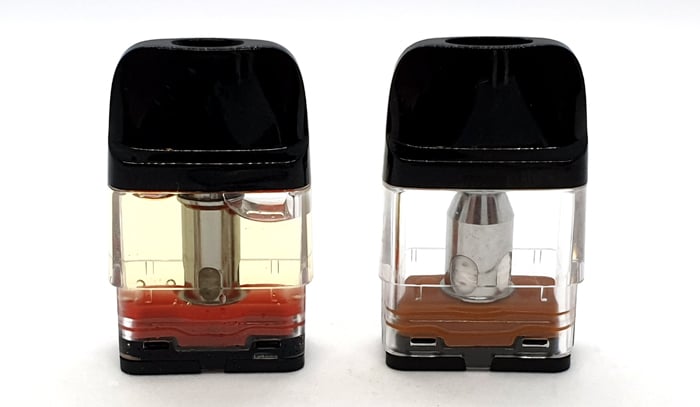
These look to be chunky and robust affairs but I do have the 3ml versions!
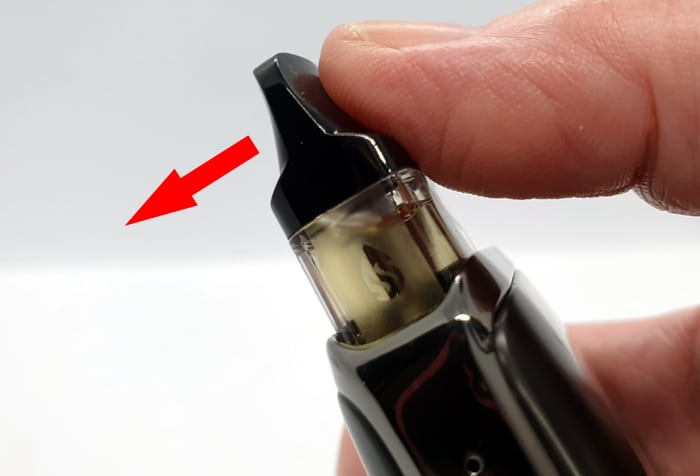
At the top is the removable Black plastic mouthpiece. This is super comfortable in use.
You have to sort of “Snap off” the mouthpiece to access the fill port. It is not as hard to remove as some other brands but still takes a bit of effort. I have resorted to biting the mouthpiece – but I do have poor grip in my hands.
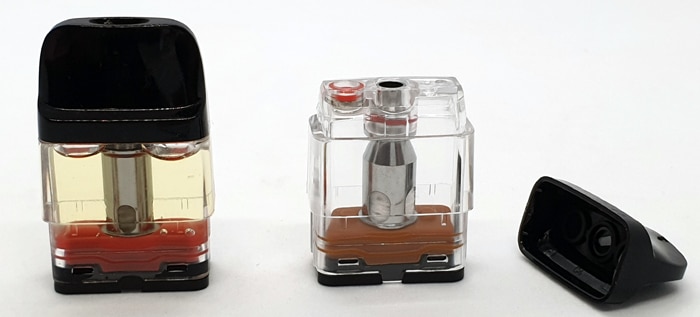
When you have removed the mouthpiece you will be faced with 3 holes in the top of the pod.
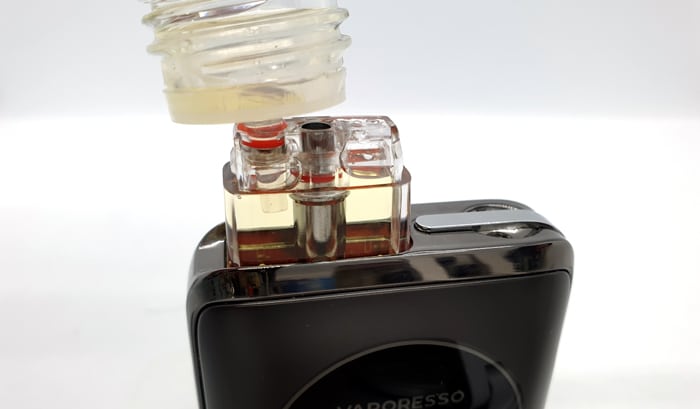
The Red hole is the fill port and it has a valve. When you push the bottle nozzle into this port it will open and allow you to fill.
The centre port is where the vapour comes through so do not add any e-liquid here!

Alongside the centre port is a vent port. This allows air to escape as you fill the pod and prevents airlocks.
The sides of the pod are fully transparent and give a great view of the e-liquid level. Some of the pod is obscured when it is installed on the mod, but you can always tilt the device slightly to see if there is e-liquid present. But as a rule I would refill once you cannot see the e-liquid level above the mod.
In very faint etching you will see the legal logos etched onto one side of the pod and “Vaporesso XROS” on the other.
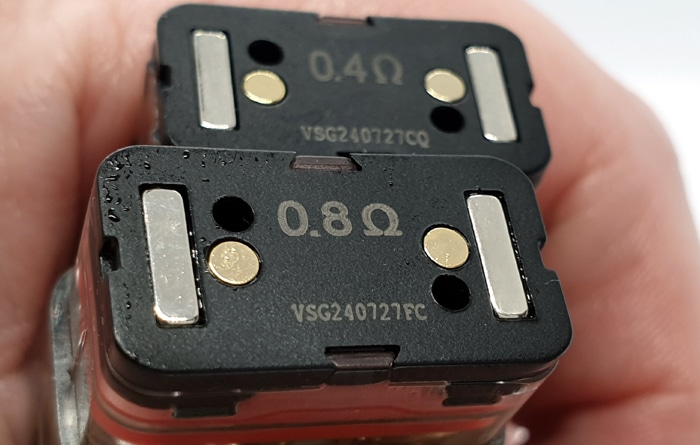
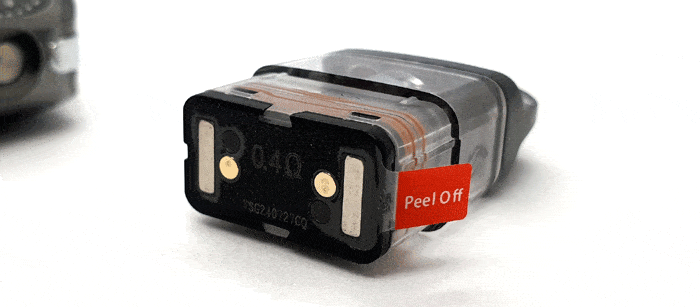
At the base of the pod the pod resistance is very clearly marked. You will also see the 2 magnets and 2 electrical connections. This means the pod can be inserted either way around.
Quick Start Guide
The kit comes with the 0.4ohm pod installed. Make sure to fill this before removing the isolator sticker at the base of the pod. If you vape before filling this will burn out the coil and the pod will need to be binned.
You will need to fill, charge and set up the device to get going – I will guide you through the steps below!
Basic Operation
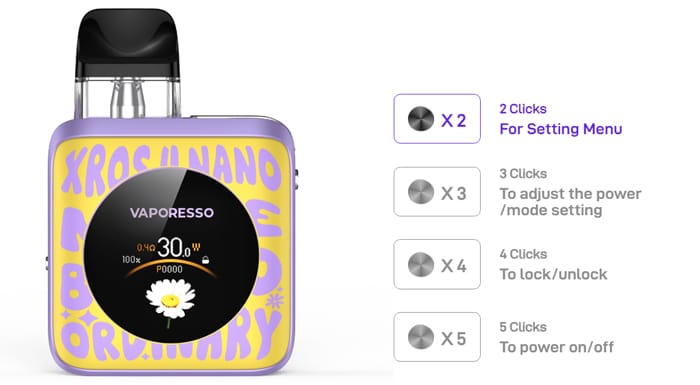
- Power On/Off = Press the operation button 5 times to turn on or off.
- Vaping = Simply inhale on the mouthpiece to vape or if manual firing is turned on you can press the button to fire.
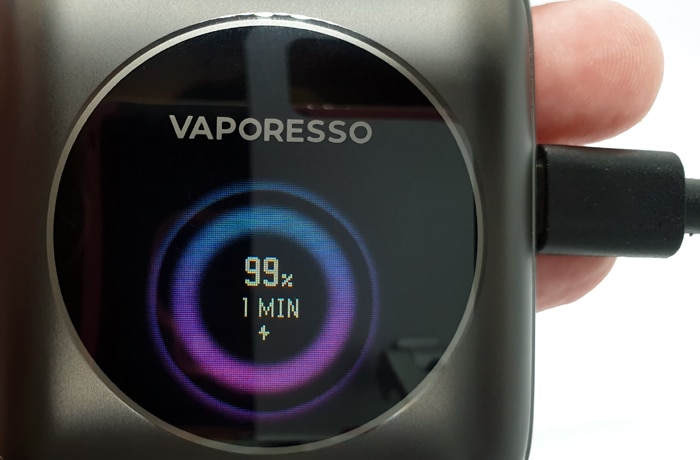
- Battery indicator = The screen displays the battery charge remaining when you vape or press the operation button.
- Battery indicator when charging = The charge percentage and countdown timer will be displayed on the screen. When fully charged the screen will show “100%”.

- Lock / unlock operation button = Press the button 4 times to lock or unlock. If you try to operate the button when it is locked, the screen will prompt you to press the button 4 times to continue! When the button is locked this is auto draw firing only. When it is unlocked you can use both methods.
- Settings menu = Press the operation button twice to enter the settings menu.
- Screen theme / animation = When in the settings menu press the button to scroll through options. You can choose between Motorcycle, Universe or Flower. Or you can turn the animation off completely.
- Adjust output (0.4ohm pod) = Press the button 3 times to enter adjustment mode. The current power output figure will flash. Press the button to increase the power until the power you require is displayed. Once you have reached the maximum power it will return to the minimum so you can start again. Wait 3 seconds or inhale on the mouthpiece to confirm the power level selected.
- Adjust output (other pods) = Press the button 3 times to choose from the 3 power level options – Normal, Eco or Power. Press the button to switch between them and leave the device to stand once the one you require is displayed. The screen will return to the home screen.
- Puff counter reset = Press the operation button twice to enter the settings menu. Use the button to scroll down to “Puff Clear” and press to confirm.
- Adjust airflow = move the slide switch on the side of the mod to increase / decrease the incoming airflow to your preference.

Top = Fully Closed. Bottom = Fully Open
Vaporesso XROS 4 Nano Protections
- Low battery – The screen will display “Battery Low” and the device will stop firing. To rectify charge the battery.
- Short circuit / too low resistance – The screen will display “Low Resistance” and the device will stop firing. To rectify clean all pod and device contacts. If still not working try a new pod. After that if the issue persists the device may be faulty.
- Open circuit / no pod installed – The screen will display “Check Atomizer” and the device will stop firing. To rectify make sure a pod is installed. Clean all pod and device contacts. If still not working try a new pod. After that if the issue persists the device may be faulty.
- Over time – if you vape for longer than 8 seconds the screen will display “Over Time” and the device will stop firing. To rectify simply inhale on the mouthpiece or press fire again.
- High temperature – The Screen will display “Over Heat” and the device will stop firing. Wait until the device has cooled down and continue vaping.
How To Charge The Battery
The charging rate is specified as 2A.
- Using the included USB type C cable, connect the small end into the USB port on the mod.

- Connect the large end of the cable into a suitable USB outlet.
- The screen will display the charge time remaining. Once fully charged the screen will display “100%” and the screen will stay on.
I found it took around 35 minutes to charge. That is slightly above the 30 minute boast of Vaporesso but I am happy with that!
How To Fill the Pod
If using a new pod leave to stand for 5-10 minutes after the first fill to allow the coil to saturate with e-liquid.
- You do not need to remove the pod for filling.
- Snap off the mouthpiece by pushing it to the side.

- Push down on the Red port with e-liquid nozzle.

- Fill whilst observing the e-liquid level through the side of the pod.
- Replace mouthpiece.
How Does The Vaporesso XROS 4 Nano Perform?
As there are different types of pod here, I will use different e-liquid to suit each.
If any of these terms are over your head – have a read of our handy guides below!
- MTL V DTL – A Guide To Vape Styles
- VG and PG in E-liquid – all you need to know
- Beginners guide to E-liquid
- Nic Salt E-liquid
0.8ohm Pod
For this pod, I used my own e-liquid mix which is 50/50 PG/VG made from IVG Bubblegum Concentrate at 20% ratio. This is quite high a flavour ratio as I prefer plenty of flavour, but sadly this means it can be a coil killer sometimes.
I add nic salt to approx 6mg strength.
As mentioned above apart from the 0.4ohm pod, the device will only let you choose 3 power settings.
I did try them all but my favourite was actually “Normal”! In Eco mode it is still a good vape but slightly muted. Power mode gave a bit more heat and I found I took shorter vapes.
There is such a beautiful flavour and smooth vape to the Normal mode – that it is my preference.
Not to mention the impressive amount of vapour, which seems thicker than with the same e-liquid in different kits.
This is obviously why people love the XROS kits – this pod is excellent!
So far after 450 puffs and 7 x 3ml refills the flavour is still epic!
0.4ohm Pod
For this pod I used a higher VG e-liquid – the Ruthless Energy Drank at 70% VG / 30% PG. I have added no nicotine to this as I love a stronger flavour!
The recommended wattage for this pod is 25W and the mod automatically set itself to this! Saved me a job!
Straight off the flavour was incredible – even down to being able to catch the fizz in the background of this e-liquid. In fact this is the best device I have ever tried this e-liquid in!
Wow absolutely amazing.
It is a bit warm and I do think the airflow is slightly too restrictive for this power level and thus I didn’t want to increase the output any further.
I thoroughly recommend this pod for your higher VG e-liquids as it just brings the flavour to life!
10/10 all day long! I have had bigger kits with sub ohm tanks that can’t match this for flavour!
0.6ohm Pod
As Vaporesso kindly sent me a pack of these in addition to the kit I will add what I think!
For this pod I used the same e-liquid as the 0.8ohm pod.
Coming soon…
Airflow
I use a rating system for airflow – 0= fully closed and 10= like breathing unrestricted fresh air!
For the 0.8ohm pod I would say it is around 1 when fully closed – you can still get it to fire. Fully open I would rate the airflow at around 5. So it should suit MTL and RDL vapers!
With the 0.4ohm pod I do think the airflow is slightly too restrictive. Even fully open it is around 5 on my scale. This means that the extra vapour and warmth seems to have nowhere to go when you are inhaling and it gets a bit warm. This does need slightly more open airflow to be able to get the best performance from this pod – but as it stands it is still pretty good. As with the 0.8ohm pod fully closed the airflow is around a 1.
Leaks?
Sadly I did get a lot of leaking with the 0.8ohm pod, but the 0.4ohm pod was perfect.
I am not sure if it was something I was doing wrong, but the 0.8ohm pod really did not like me.
Every time I filled it I would get a mouthful of e-liquid and it would also leak into the pod compartment. Also it actually came out through the airflow slider too.
If you do get this issue, I suggest…
- Remove the pod from the device and wrap the pod base with tissue. Blow down the mouthpiece until you can hear all the e-liquid has escaped.
- Dry the pod compartment with a tissue or Cotton Bud. If there is still some e-liquid trapped I would fully open the airflow adjustment inlet hole and blow through it. Mop up any remaining e-liquid in the pod compartment.
I am used to the sometimes leaky pods of the OXVA Xlim but this seemed to be worse.
Perhaps I am filling it wrong somehow? But the pod does have a great venting system so I shouldn’t be getting airlocks which push out the e-liquid? Am a bit stumped.
Mod Performance
This is super responsive, even at the higher output with the 0.4ohm pod.
The auto draw kicks in quickly regardless of the airflow setting.
Even when the battery level is in the Red (under 20%) I found virtually no drop in actual power. So it does seem to regulate the output really well.
One slight area of concern for me is the battery life. Considering this has a larger battery than similar mods, it does seem to discharge a bit quicker. Are the screen and the animation draining it? I will talk all about that more in the next section.
Battery Life
This will always rely on your own vaping habits and the pod selected. I am a very heavy vaper so this must be considered.
Plus there are other variables at play here. There are 3 animated screen themes and you can turn them off too – so will that impact the battery charge life?
I examined whether the animations did impact battery life with the 0.8ohm pod. With the animation on Motorcycle and the mode set to Normal, I got 6 hours – 203 puffs. I turned the animation off and got 6.5 hours and 209 puffs. This difference could also be down to how long the puffs I took were – so it is by no means a scientific method!
Personally I would turn the animation off, you can’t see it when you are vaping anyway! The screen still displays the theme.
I tend to compare the XROS 4 Nano with the OXVA Xlim SQ Pro. They are very similar. With the 0.8ohm pod on the OXVA I got around 7 hours and 300 puffs which is a bit more from a slightly smaller (1200mAh) battery.
With the 0.4ohm pod at 25W I got around 4 hours and 149 puffs.
Pros
- Really classy looking kit
- Packaged and protected well in transit
- Beautiful design details
- Generous kit contents
- Quick 35 minute charge time
- Incredible flavour from 0.8ohm and 0.4ohm pods
- Auto draw and button operation means you have a back-up if the auto draw sensor fails
- MTL to RDL airflow adjustment
- Compatible with previous XROS pods
Cons
- Slightly chunky and heavier than you would expect – but not excessive!
- Instruction manual text is very very small and no online manual
- Leaks from 0.8ohm pod
- Battery life was shorter than similar devices with smaller batteries?
- Airflow slightly too restrictive for the 0.4ohm pod
- Only 3 power modes available for anything other than 0.4ohm pod
Vaporesso XROS 4 Nano Final Review Verdict
So did my first XROS experience impress me? Has it overtaken or been added to my favourite daily vape the OXVA Xlim range or my second favourite the Caliburn Range?
Well – yes and no…
Flavour wise this is up there with the Xlim – absolute perfection from the 0.8ohm and 0.4ohm pods.
But sadly I have had to drop a couple of points for the 0.8ohm pod leaking and instruction manual being very small text. It might just be a rogue pod that caused the leaking or even my own error? A couple of other little whinges are shown above in the “Cons” section – including the lower than expected battery charge life and not enough airflow for the 0.4ohm pod.
If these issues were ironed out – this kit would get 10/10 in all aspects! I am so taken with the absolutely delicious vape experience I keep wanting to use it despite the issues.
The 0.8ohm pod was super happy with 50/50 VG/PG e-liquid and the 0.4ohm pod really shone with a 70/30 VG/PG. This kit can happily do both.
So if you are an XROS fan and want to upgrade – there are a lot of nice features on the XROS 4 Nano.
I am unsure if I can wholeheartedly recommend it. The leaking is a big issue – however this only occurred with the 0.8ohm pod – no issues with 0.4ohm. But I am still torn as the flavour is just flipping epic. The build quality in general is also incredible.
Have you tried the Vaporesso XROS 4 Nano? Let me know what you think in the comments below!


If I connect this vape pen to a PC does it just charge or can I access the main pen as a device to alter the animation and or theme?
Thanks for the advice, Michelle! That makes sense. I’ll try the 50/50 and see how it goes, but I’ll definitely keep a higher VG ratio in mind in case it leaks. Appreciate the help!
Hi Michelle, do you think a 50/50 liquid with 9mg nicotine would work well on these 0.4 ohm coils?
50/50 would probably work – but to be honest I would prefer a slightly thicker e-liquid – say 60 VG/40 PG or 70/30.
You can try it but if it spits or leaks then it would be better to try a higher VG ratio. Also the more PG the stronger the throat hit. Which is fine for higher resistance coils but it might be a bit harsh with the 0.4ohm.