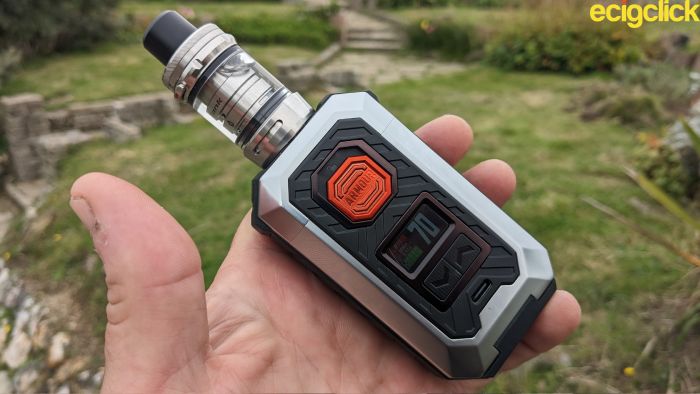
It’s been a hot minute since I last reviewed a sub ohm set up but here we are today, paying closer inspection to the new Vaporesso Armour MAX box kit.
..And it’s a beast!
 Maybe it’s just the devices that have been coming my way but it does seem like Vaporesso have been concentrating their attentions more towards the pod kit side of the industry for quite a while.
The LUXE and its variants for example. Or the XROS range of pod kits. Don’t get me wrong – the more the merrier and anything to combat a tidal wave of disposable vapes.
Less waste and more chance of E-liquid manufacturers getting their wares off the shelves.
But it does seem MTL (Mouth To Lung) products have been getting the monopoly of late.
There’s still a healthy contingent of DTL (Direct To Lung) vapers and it may feel like an eternity since anything new has come their way. (We tell you what MTL and DTL mean in our Guide To Vape Styles).
The Vaporesso Armour MAX box kit is here to come to the rescue. And it’s a monster of a kit.
What Can We Expect From the Vaporesso Armour MAX Box Kit?
The Vaporesso Armour Max is armoured to the teeth and a veritable box Mod of tricks both inside and out.
For a start it’s comprised entirely of TPU (Thermoplastic Polyurethane), used in a wide range of demanding applications where durability, flexibility and tensile strength are required characteristics.
It’s been designed to stand the test of time, capable of withstanding daily wear and tear.
There’s support for both 21700 and 18650 batteries. This does mean the former is likely to last longer but either option has been catered for.

.. Well, it is to me, anyway.

You can find out more about COREX tech in our How COREX Tech is Improving Flavour article elsewhere on the site.
Speaking of flavour intensity, the Armour MAX has been designed exclusively for Direct To Lung (DTL) vapers. It also supplies all the power needed for thick, dense vapour production.
A 0.96in TFT colour screen displays all the essential vaping data required both clearly and intuitively. Customise your vaping experience in the way that suits you.
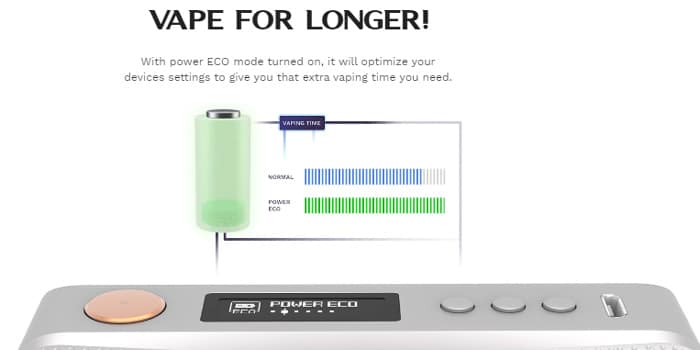
Use the fire and menu rocker button to make these customisations and choose from Eco, Pulse and F(t) mode. There’s even the option to tinker with temperature control mode if that’s your bag.
Again, we’ve covered these modes elsewhere on the site. Check out the Vaporesso Target 200 Kit for more details.
Inside the Box
Please note: The image below does not reflect the final release version.
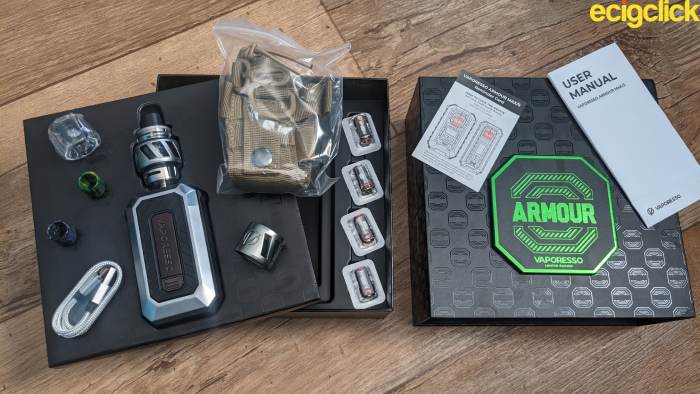
- Vaporesso Armour MAX MOD
- Vaporesso iTank 2 (8ml glass pre-installed)
- GTi 0.2ohm mesh coil (pre-installed)
- GTi 0.4ohm mesh coil
- Spare 2ml glass – TPD compliant
- Tank protective cover (pre-installed)
- 2 x O ring
- Spare silicone filling plug
- 2 x 18650 battery adaptor sleeves
- Type C USB charging cable
- User manual and warranty card
- Safety manual
- Warning card

Vaporesso Armour MAX – Specifications
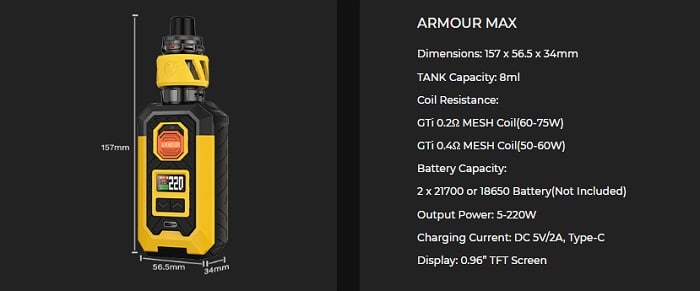
- Size: 157 x 56.5 x 34mm
- Weight: 158g
- Material: TPU
- Battery capacity: 2 x 21700 / 2 x 18650 (not included)
- Output power: 5 – 220W
- User modes: Variable Wattage, Smart, Temperature Control (TC-SS, Ni, Ti), F(t), Pulse, Eco
- Charging: 2A USB Type C
- Display: 0.96in TFT colour
- AXON Chipset
iTank 2 – Specifications
- Size: 30×59.8mm
- Capacity: 8ml (standard) / 2ml (TPD)
- Coils: GTi coil range
- Button / slide top fill
- Adjustable bottom airflow
- Corex heating tech
- 810 drip tip
- E-liquid recirculating system to prevent leaks and condensation
It’s all a bit odd, really.
From drip tip to base I measured the tank as being 55mm in height and the diameter much nearer to 25mm – but there ya go. Who am I to argue? lol
The 30mm diameter must refer to the actual Bubble glass size – not the tank base.
Vaporesso Armour Max – Design and Build Quality
It’s all about a rugged durability with the Armour MAX box mod. It’s the first thing that strikes me. This is clearly designed for the outdoor vaper and those working in active roles.

The TPU material feels like a cross between plastic and rubber with the majority of the Mod covered with it. It works particularly well in providing both comfort and grip when held.
It also grips any surface it’s placed on for further reassurance.
So on the top we have a gold plated spring loaded 510 contact. If you’re planning on using your own tank I’d suggest looking at those with a diameter of 26mm or less to prevent any overhang.

Battery Door
Directly below this is the slide mechanic for the battery door.

The batteries only fit one way and their polarity is indicated on the inside of the hinged door.
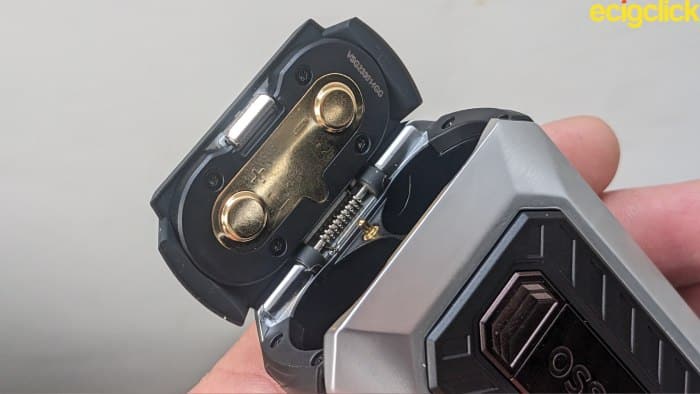
..Just remember to remove the two sleeves if you’re planning on using 21700 batteries. You’ll look a bit silly if you don’t! 😉
Display
I love the screen display! It’s set out a little bit differently on the Armour MAX.
Mode, puff counter (vape duration when using), coil resistance and independent battery health meters are all shoe horned onto the left hand side of the display while wattage output takes up all of the right side.
The colour TFT screen means that all information can be clearly read and you’re never in doubt as to how hard you’re hitting the device.

The Mod doesn’t ‘Round Robin’ or reset once maximum output is hit but that’s never really been an issue for me, anyway.
Uni-lock
This shows real innovation in my opinion. Not sure if it’s been done before but it’s new to me!
The fire button doubles up as a locking mechanism. And again, it’s all down to a simple slider. Slide the button down to use as the fire button and slide up to force lock the device.
How easy is that!

Finally, below the rocker button there’s a type C USB charging port. Now I know the Mod isn’t IP67 rated but it would’ve been nice were it not so exposed.
Yes it’s recessed but given the overall build quality of the Mod does look prone to dust, dirt or potential damage.
It’s the only thing that looks fragile about the device.

It’s just something to pay closer attention to if this is your method of recharging.
Vaporesso iTank 2 – Design and Build Quality
Our Shell made a detailed analysis of the iTank 2 when she coupled it with another Vaporesso Mod. Check out her detailed review of the Vaporesso Gen 80S iTank 2 for the full low down.
I’ll just go over the basics here.
You get a removable 810 drip tip with the iTank 2. Not the prettiest one in the world so you might want to swap it for one that suits your chosen colour scheme asap.
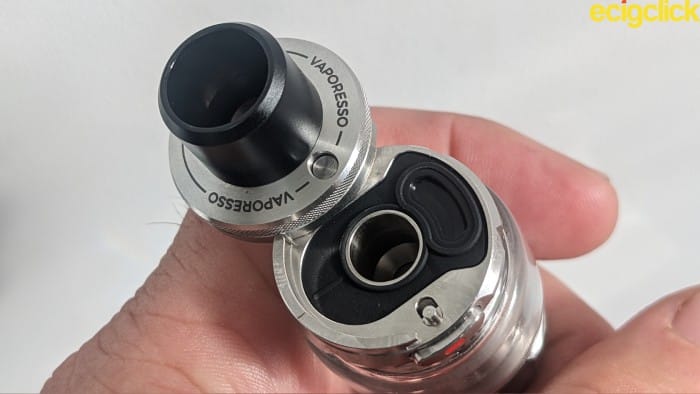
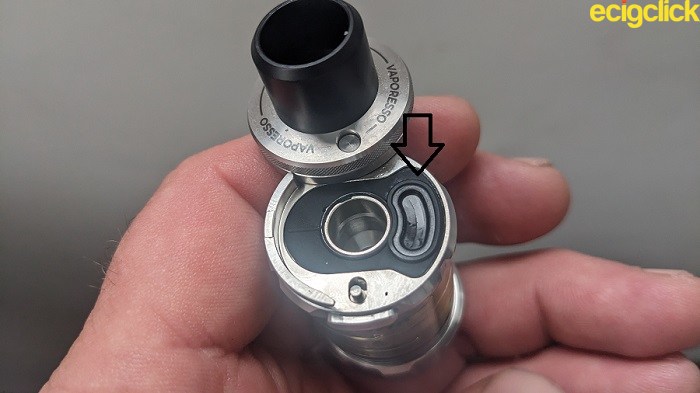
To gain access to the fill port it’s a simple case of pressing down on the red marker just below the top cap. There’s also an arrow to mark the exact position.
I like the attention to detail! Nice work, Vaporesso.
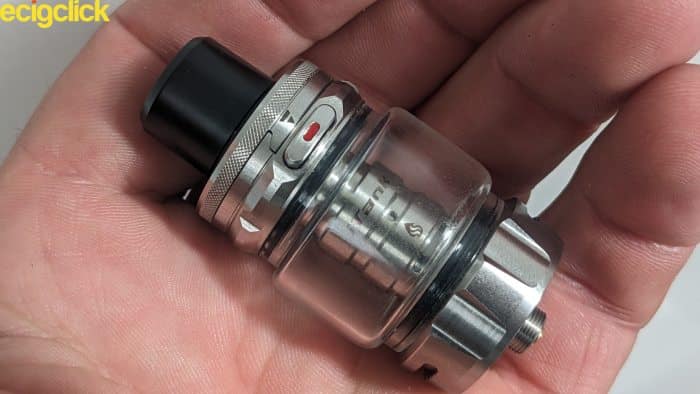
Word of warning! The spring mechanism is very strong and the top cap swings a full 180 degrees when opened.
This does give you ample clearance to insert any bottle nozzle of choice into the generously sized fill port opening. Something I very much appreciated.
Airflow
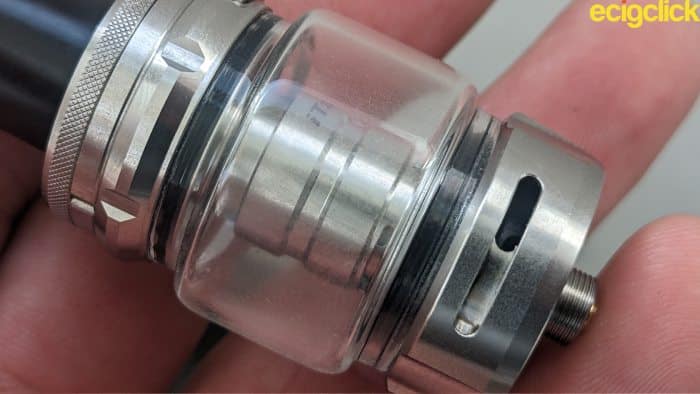
The dual airflow slots themselves are mahoosive!
Fully open they measure around half an inch, so if sauna like vapour production is your fetish it looks like the iTank 2 has you covered.
Tank Base
Unscrewing the tank is made easy with additional, bolder knurling patterns and the threading is butter smooth. No squeaky mice here!
Gold plated contacts inside the tank ensure optimal conductivity and power between the Mod and GTi coil.
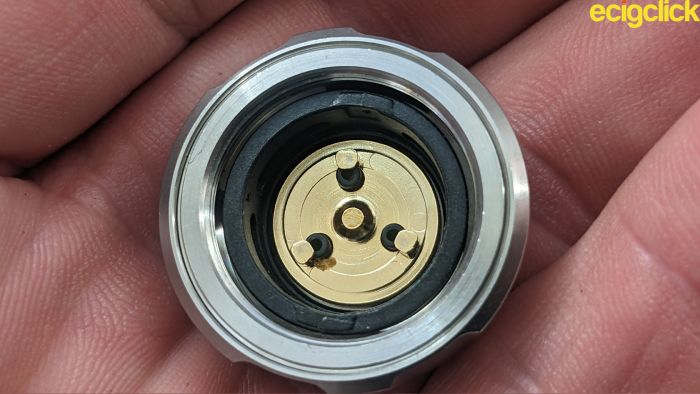
Let’s delve into that right now.
Quick Start Guide
How To Install or Change the Coil
- Unscrew the tank from the Mod (anti-clockwise)
- Unscrew the base of the tank (clockwise)
Using a finger nail (if you’ve got one!) gently pull the existing coil out of the tank chamber
- Push the new coil up into the tank chamber ensuring a firm seal
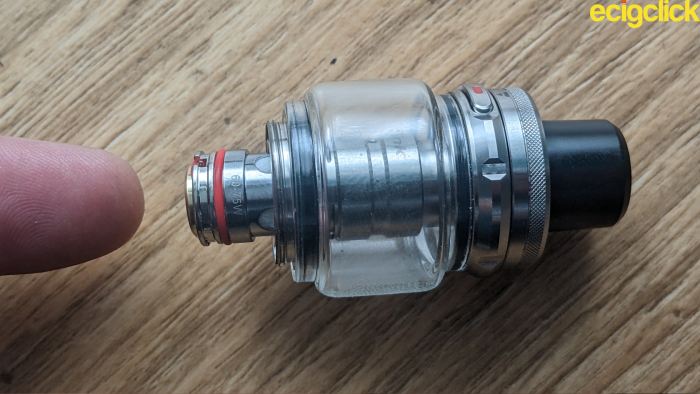
The Red O-ring should not be visible once pushed firmly into place
- Screw the base back onto the tank (anti-clockwise)
How To Replace the Glass Tank
- Unscrew the base from the tank
- Carefully pull down on the glass tube to slide it out. Use the knurling on the top cap for additional grip
Carefully push the replacement glass tube up and over both silicone O-rings. You can use a small amount of e-liquid to lubricate the O-rings when replacing the glass.
Screw the base back onto the tank
If it helps, use a gentle ‘twist – turn’ motion when removing or replacing glass tubes.
Try to keep the glass as straight as possible when replacing or removing.
Make sure the glass tube is firmly seated before screwing the base back into place.
How To Fill the Vaporesso iTank 2
- Press the Red marker to swing the top cap open
- Locate the silicone fill port and push a bottle nozzle down into the fill chamber
- Gently squeeze E-liquid into the tank making sure not to overfill.
- Manually swing the top cap back until it clicks into place
If this is the first time you’re filling the tank, let the E-liquid soak into the cotton wicks for around 3-5 minutes prior to vaping.
How To Operate the Armour MAX
The device will spring into life as soon as two batteries are inserted.
- 5 clicks of the fire button to switch the device on or off
- Use the menu rocker button to adjust power to suitable levels depending on the coil installed
- Use the fire button to vape
- To lock the device simply push the fire button up. Slide it down to unlock
- The device can also be locked by holding the up and down menu rocker buttons together. Press them both again to unlock
- Press the fire button 3 times to enter the mode select screen. Use the menu rocker to highlight selected mode and press the fire button to activate.
- Press and hold the fire and left menu rocker to activate Smart Mode
F(t) Mode (Default)
Is a method of automatically adjusting the output temperature and heating speed versus time to deliver better flavour. This is made possible by a series of differing voltages applied in quick succession during each vape.
Pulse Mode
Pulse mode is where the device pulses the voltage output every 0.02 seconds to improve the efficiency of the vape and keep a more stable output.
Eco Mode
This is basically a standard variable wattage mode where you can adjust the power to suit your own particular needs.
Temperature Control Mode
Using the main mode select screen, pick from Stainless Steel, Nichrome or Titanium coil material then hit the fire button to activate.
Press the menu rocker to make appropriate changes to the power output.
Press the Up menu rocker button and fire together to adjust wattage while in TC mode.
Hold the down menu rocker button and fire to lock or unlock TC resistances.
Smart Mode
This feature is ideal for the newer sub ohm vaper as it automatically detects the best power setting for the coil. Using this prevents any dry burns and potential damage the coil.
Settings Mode
Turn Smart mode on or off, lock temperature control, reset puff counter, adjust colour theme and brightness or return to default settings.
Smart mode automatically detects the best power for the installed coil.
Armour S Mod
The Vaporesso Armour S mod is the smaller sister device to the Armour Max I am reviewing.
Don’t worry if you only have one battery. The Armour S Mod has you covered by using either a single 21700 or 18650.
It’s basically the same device only reduced in width. Capable of a maximum output of 100W it still comes complete with the same GTi coils of its bigger brother, the MAX.
The info I have states the iTank 2 comes with a 5ml glass but for UK audiences it’s going to be restricted to 2ml, obviously.
You get all the modes of the Armour MAX although the 0.96in TFT colour screen layout has been altered to reflect its single battery capabilities.
How Does the Vaporesso Armour MAX Perform?
I tested the pre-installed 0.2ohm GTi mesh coil in the default F(t) mode first. It’s the mode the device fires up in once two 18650 batteries are installed.
Output parameters for the coil are between 60-75W so I opted for 70W as a good representation of what to expect.
Doozy Temptations Jam Tart was the E-liquid flavour of choice. It’s a 70VG/30PG ratio, highly suited for this powerful sub ohm mesh coil.

With the dual airflow ring wide open the vape is mildly warm. I was expecting slightly more heat but flavour is off the charts!
Strawberry Jam literally spills from the exhale with most of the pastry notes being sucked up during inhale and released underneath a sweet fruit on the way out.
Highly pleasant. Can you tell I love dessert vapes?
The way flavour is distributed across the vape is also incredible. Consistency is key to performance when it comes to F(t) mode and this can be put down to auto adjustment of temperature and heating speed of the inhale.
All the time the fire button is being depressed it never feels as though anything is being lost. A level playing field at all time and it really does show.
Extended vapes of 5-6 seconds proved the point.
Airflow
I was so impressed with a wide open airflow that it actually took a while for me to make any adjustments! The power setting also seemed to be exactly what I wanted too.
On this setting I still think there was about a 10% restriction but that may be due to dual airflow as opposed to three adjustable airflow slots.
This minor restriction increases to around 40% when cutting airflow in half. It has a dramatic effect on the sweetness of the vape. The flavour is also more concentrated on this setting.
I could easily pass this off as a semi restrictive lung vape. It feels comfortable enough with just a tickle created on the back of the throat.
Nicey!
Warmth increases too and most noticeable on the inhale. To be quite honest, I did feel flavour was starting to become too ‘compacted’ for my liking. Not as enjoyable with slow, drawn out exhales but again the consistency was excellent.
Further airflow adjustments weren’t to my liking at all. The restriction became too uncomfortable and even with 3mg freebase included in the E-liquid, I began a series of coughing fits!
It becomes a RDL (Restrictive Direct Lung) vape and not what the coil is designed for at all, in my opinion. You’ll definitely want to reduce power down to at least 60W if this is your preferred setting.
Vapour Production
Clearly if you want to be chuckin’ dem clouds, opt for unrestricted airflow.
You can inhale comfortably for as long as you desire and receive a pleasant throat hit with masses of thick white vapour tumbling across the room on the way out.
A highly pleasant experience after reviewing so many disposable vapes!
.. I’m in dessert vape heaven!
Pulse Mode
Quite tricky to describe.
Where F(t) mode would be flavour on steroids, Pulse mode seems to opt for a more subdued response in terms of power.

There’s just a little less clout behind it but flavour properties are still up there.
It’s a stable vape, that’s for sure no doubt due to the way voltage is supplied to the coil.
So maybe a few of the flavour characteristics aren’t quite as bright or well defined but other than that, I really couldn’t notice much difference between this and F(t) mode.
In summary, if you want less of a feisty vape experience go for this mode.
You’re still getting the works.
0.4ohm GTi Mesh Coil (Rated 50-60W)
I tested this in ECO mode and switched Smart mode on. The 70W setting of the 0.2ohm coil instantly changed to 55W and this is what I went for when vaping.

Using Naughty Juice Vanilla Custard was a pleasant experience. Another 70VG/30PG E-liquid ratio, the tank was banging out the flavour.
The Vanilla was more prominent than the custard but the taste was clean and well defined at all times. Consistently good.
Yes, I could’ve done with a little more warmth and pushing the power another 5W obviously wasn’t going to improve that much.
Further Airflow Restrictions
In terms of this, the 0.4ohm coil behaves very much like its lower resistance alternative.
I feel the restrictions are about the same, regardless of airflow setting. I can’t say I noticed much difference in flavour quality either. Still impressive but not really intensified.
Again, I wouldn’t suggest reducing airflow to anything beyond two thirds closed. That’s not the way to vape these mesh coils. This is a sub ohm set up where the coils crave too much power for a restrictive lung hit.
I found half open – half closed to be the best restriction for me, personally.
Vapour Production
Superb!
It won’t take long for a room to fill with vapour so opening a few windows may well be advised when using the Vaporesso Armour MAX kit!
Pros
- Solid, durable design that’s also aesthetically pleasing
- Locking a device has never been easier with the Uni-lock / fire button
- Power and ramp up time is up there with the best. It’s instant!
- Quality screen layout. Easy to view all relevant info and settings
- Easy to navigate menu options
- F(t) mode is amazing. Flavour quality and consistency has never been this good!
- Quick release battery door. Replace those batteries in seconds
- Option of using wider tank sizes with the Armour MAX Mod.
Cons
- Can be a juice guzzler but that’s subjective to power output, really
- Lack of protection around the USB charging port
- The Uni-lock slider feels a bit loose. Accidentally armed on a few occasions
Final Review Verdict
You’ll notice no review on temperature control.
Unfortunately it’s something I never used so can’t provide info on that but the other modes more than make up for this in my opinion anyway.
If you need a representation of how powerful the Armour MAX can be, check out its juice guzzling capabilities.
I got 86 puffs from the 2ml iTank 2. Says it all doesn’t it. But here’s the rub.
In terms of battery performance using two 18650’s. I don’t have the newest pair in the world and it’s always going to be subjective to power settings.
I got around 4 hours use from 60W output. The 2ml tank was refilled on numerous occasions and 262 puffs were registered on the LCD screen.
Each and every single vape was as flavoursome as the last. When airflow was wide open I really did feel the tank and Mod were working in an extremely balanced and uniform manner.
Delivering the goods consistently at all times. Performance wise, I simply couldn’t ask more from the set up.
I’d definitely recommended using the higher power settings for either GTi coil. With as much airflow as you can handle. That’s what they’re designed for.
Sometimes this can result in a more diluted flavour with some devices admittedly but that’s simply not the case with the Armour MAX and iTank 2.
A word of warning though!
Don’t let those E-liquid levels fall too low. I did and it resulted in a dry hit that wouldn’t budge even after re-filling the tank. Another indication of the power of this set up.
I recommend 70VG/30PG E-liquid ratios for the 0.4ohm coil and 80/20PG for the 0.2ohm alternative.
Neither coil will push the Armour MAX to its full potential but that’s the beauty of box Mods. You can always run RDA’s (Rebuildable Dripping Atomizers) with super low resistance DIY coils if that’s your thang.
Durability, consistency, reliability, accessibility and versatility. Big words for a Mod delivering big results. That’s the Vaporesso Armour MAX.


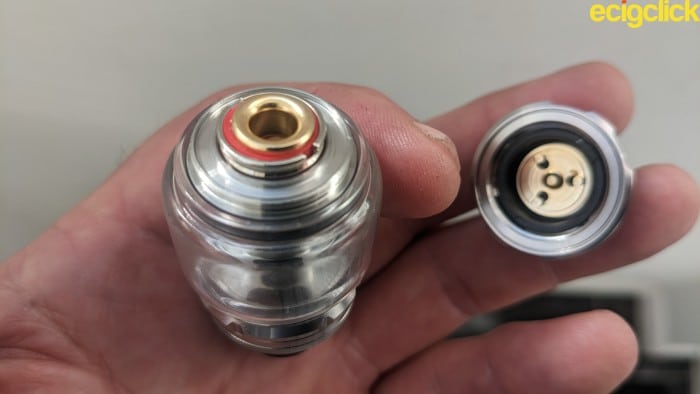 Using a finger nail (if you’ve got one!) gently pull the existing coil out of the tank chamber
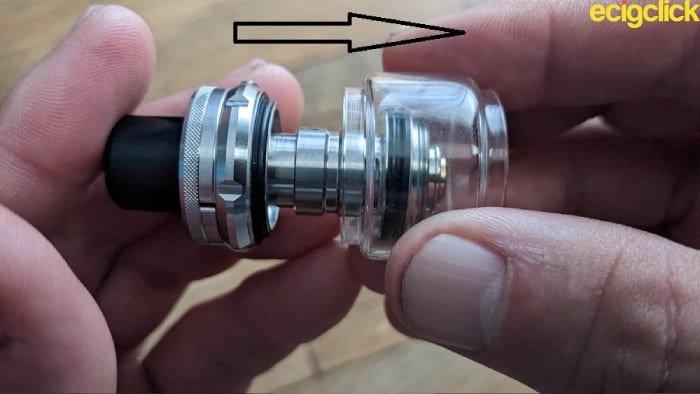 Carefully push the replacement glass tube up and over both silicone O-rings. You can use a small amount of e-liquid to lubricate the O-rings when replacing the glass.
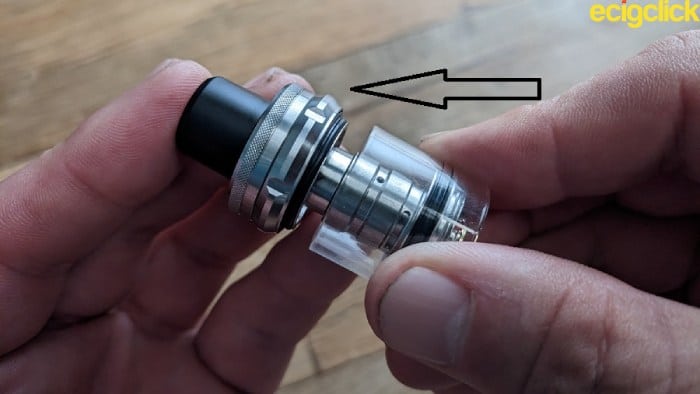 Screw the base back onto the tank




Good write up, thanks. My max kit has just arrived today after reading your review. I even ordered some of that Jam Tart and the Vanilla custard. Vaping the jam tart now, it’s got a great flavour. I’ve got four 21700’s coming tomorrow.