Vamo V5 – Variable Voltage/Variable Wattage APV
I have recently reviewed some great vape devices such as the Cool Fire 1 and Cool Fire 2 from Innokin so was looking forward to seeing how the updated Vamo V5 VV/VW would hold up.
In the box / Presentation
The Vamo V5 kit I purchased came in a nice presentation box.
In the box you will find the following:
- 1 X Vamo V5
- Instructions
Body, design & function
The Vamo V5 is built to take 2 different size of battery, the 18350 (short) and 18650 (long). This is a great design feature that allows you to make the APV a touch more compact which can come in handy if you are looking to use this out and about.
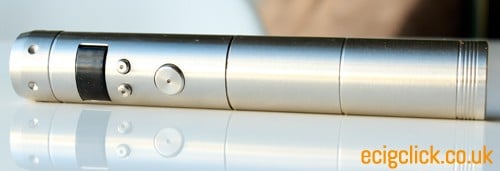
The stainless steel body feels quality and breaks down into four parts; the end screw cap (with vent hole & battery spring), extension tube to fit the longer 18650 battery, the main body and removable collar. The main body of the Vamo features 3 metal buttons and an OLED display. 
As mentioned the quality overall is very good, I have only 2 slight negatives. First is with the main power button. It is just a touch on the rattly side as there is a bit of movement side to side.
If they could take the button that Innokin used for the Cool Fire 1 and 2 which were both (without sounding weird) a pleasure to press!
Second is with the small gap that is present when the clearomizer I am using is screwed on top.
The OLED screen has a clear display and the functions are easy to get the hang of. Two buttons are used for changing the Voltage, wattage as well as checking the working resistance of the clearomizer you are using.
- Pressing the power button 5 times will turn the Vamo on and off.
- Pressing both + and – buttons together will display the menu where there are 3 options, Power/Voltage – LCD Display – LCD On/Off. Press the + button to scroll through these and the – button to select and change each of these options.
- When you have selected to run the Vamo in either the Voltage or Power (Wattage) mode you can then just use the + or – buttons to scroll to your preferred setting. In power mode this is from 3W to 15W in 0.5 increments and voltage from 3.0V to 6.0V in 0.1 increments.
- Pressing the + button down for three seconds will display the current working resistance of the tank you have on top.
- Pressing the – button will display the battery voltage
If you are new to variable devices this can sound a bit complicated but that really is only on paper, once you have 10 minutes playing around with this you will zip through it quickly with no issues.
There are of course a number of safety features included:
Features
- Reverse battery protection keeps circuit safe if the battery is installed backward.
- Battery Monitoring shuts the unit off once battery has reached end of charge.
- Amperage limiting system protects against over current situations.
- Thermal Monitoring shuts the device off if it detects a high temperature condition.
- Time limit protection function, it will shut down with more than 10s each puff.OLED screen displays ” LO-Ω” if resistance lower than 1.2ohm, “LO-V” if short circuit.
Overall
Minus a couple of slight issues, the Vamo V5 has a decent quality build and the functions needed to provide a good vaping experience.
Vapour / Flavour
The Vamo V5 kit i purchased didn’t come with any clearomizer so I used an iClear 30B for this review. There are of course kits that include all you need to get started if you do need to go that route.
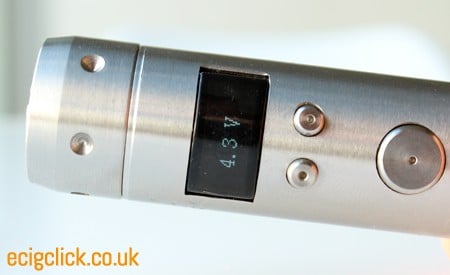
In between these issues though it does work well and with the Vamo I was getting some great results.
Both the voltage and wattage options are fluid to use and with the Apollo Boss e-liquid I am using provides some great results. I tend to use the wattage function for ease of use when I have the option and for me the best results for this e-liquid lay between 7.5W and 9W.
For those new to using this type of vape mod you will find certain flavors of e-liquid will produce different results based on the wattage or voltage you choose. As a general rule of thumb you will find the lower the V/W, the cooler the vape and less vapor will be produced.
The higher you go the warmer the vape and the vapor volume will increase. The higher end of the scale will also cause a burnt taste with some e-liquids as the coils are getting hotter. It’s really all about experimenting until you find your sweet spot, mine is usually around the 8-9W range.
Overall – The flavors and vapor volume when the Vamo V5 is paired with the iClear 30B worked well. I have however had problems with the iClear 30B with leaking so wouldn’t recommend buying this clearomizer if it is an option.
Overall – Or For those that Skip to the end!
I thought the Vamo V5 was a great bit of kit, nice clean design, solid construction and all the features and functions you will need from a variable wattage/variable voltage e cigarette.
There were only two things I didn’t like, first was the gap between the neck collar and the clearomizer tank when screwed in and the second was how the power button had a bit of sideways movement. Not a lot but it does a rattle a bit and could be improved further.
The results when pairing the Vamo V5 and the iClear 30B were good and pairing with the Aerotank provided fantastic results, plenty of flavor and vapor production.
So If you are looking for a VV/VW APV then I would say this is a great option.
Just a quick re-visit to this review and a little update. I have been using this for about 6 months now and I always find myself coming back to the Vamo V5 repeatedly and with a few batteries on rotation it is still a top performer.
For the price you can get these for now it’s a great option. Looks great in the Chrome and Black Chrome as well.


this device was my first mod with changable Batteries and it work fine. Its a little bit heavy for a woman butat home it is strong, nice, really good… could have more power
I am a fairly new vaper and this was my first intermediate mod, I’m now on a mech mod but I still use my Vamov5 every day, and use the resistance meter for building coils on RBA’s. Great kit at a grea price, got mine off ebay for 35 with batteries, trustfire charger and 6 clearo’s.